It’s possible to have a server act as a backup server, so in the unfortunate event that your main mail server goes down, mail gets queued up on the backup server until the main one is fixed.
Setting up PLESK to act as a backup MX server is fairly easy, here’s what to do.
Step 1
Log into the server you want to make a backup MX
Step 2
For every domain you want forwarded to the primary server, add it to the file /var/qmail/control/morercpthosts . If the file doesn’t exist, create it and add each domain on a new line with no www behind it, so for example:
domain1.com
domain2.com
Step 3
Now run /var/qmail/bin/qmail-newmrh which creates a binary file called /var/qmail/control/morercpthosts.cdb
Step 4
For every domain you added to morercpthosts, you must add an entry to /var/qmail/control/smtproutes (create it if it doesn’t exist), but you should add it in this format:
<DOMAIN>:<IP of DOMAIN>:<PORT>
Note that the port is optional, and can be used if your mail server port isn’t 25. So for example, the file that corresponds to my exampls morercpthosts file would be:
domain1.com:123.123.123.123:25
domain2.com:123.123.123.123:25
Step 5
Now, go into plesk and disable mail on the accounts you want to apply the backup MX feature to. You can do this two ways, in bulk or one by one.
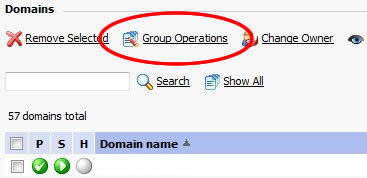
To do this in bulk, go to domains on PLESK, check the ones you want and click on “Group Operations”.

Near the bottom, you have an option to turn off Mail. Select the “turn off” option and submit the form.

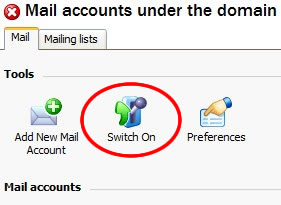
To do this one by one. Go to domains on PLESK, click on the domain you want, then click on Mail (the envelope) and make sure the icon looks like the following.

If the icon is red and says “Switch off”, then click on it and the following page should show the icon in the image above.
Step 6
Restart qmail (you can also do this via PLESK on Server>Services)
service qmail restart
Step 7
Add a new MX record to your DNS. You’ll want to give this new entry a priority higher than your primary server, so your primary may have a priority of 10 and this new one a priority of 20.
Step 8
Test your new settings. For Windows Vista type “cmd”+Enter in the search area of your start menu. On Windows XP open your start menu, click “Run” and type “cmd”+Enter. This will bring up a command line console.
Type the following, but change the emails to your specific emails (What you should type in is in Green, responses are in black and may vary slightly):
telnet 123.123.123.123 25
220 server.domain.com ESMTP
MAIL FROM: [email protected]
250 ok
RCPT TO: [email protected]
250 ok
DATA
354 go ahead
Subject: Testing
Testing
.
250 ok 1235396952 qp 32405
QUIT
221 server.domain.com
If you get any errors, chances are you missed something along the way (or your server was misconfigured to begin with). Hopefully this shouldn’t be the case and you should shortly receive a mail in your account.
Step 9
This is optional, but recommended. Make sure your backup server is using a decent spam detection, because it’s commonplace for spammers to use backup MXes by digging your domain and sending to them to circumvent stronger spam filters on the main server. For decent spam filtering, try installing qmail-scanner with another of our how-to posts.
That’s it…. remember to back up before trying this!
